
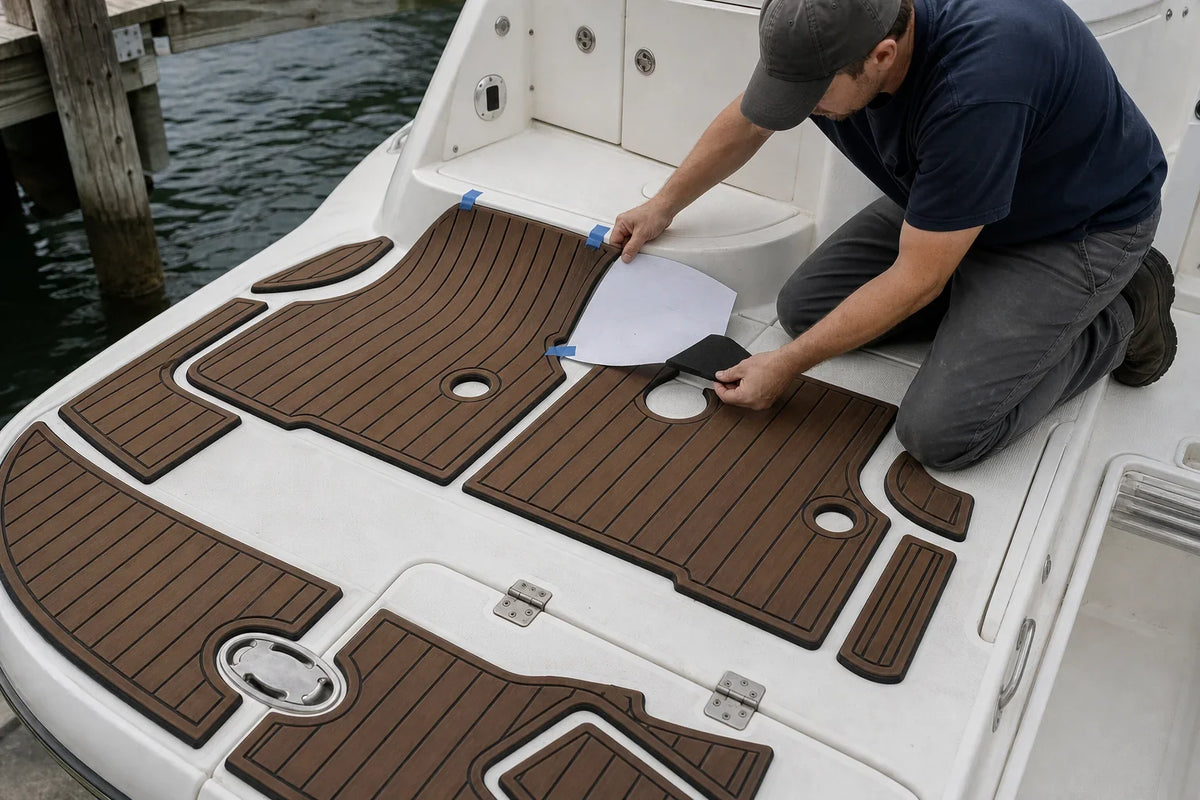
Cover image note: This AI-generated technical illustration shows a representative EVA flooring dry-fit workflow. The panel layout is illustrative, not a cutting template or a photograph of a completed customer installation.
Editorial scope: This guide covers general planning and installation principles for pressure-sensitive-adhesive marine foam flooring. Follow the instructions supplied with the exact kit and adhesive. Test cleaners on a small area and consult a professional where the deck requires repair.
Most EVA flooring problems begin before the backing paper is removed. The wrong boat layout was ordered. A hatch was measured from the opening instead of the lid. Old adhesive remained on the gelcoat. A drain edge was covered. Or a large pad was stretched into place, storing tension that later pulled at a seam.
A good installation is less dramatic. The boat is identified correctly, every piece is dry-fitted, the deck is repaired and cleaned, and the pads are placed once with steady pressure. The finished floor looks simple because the measuring and preparation were not.
What EVA foam flooring does well, and what it does not
Marine foam decking is commonly made from EVA or a PE/EVA blend. It is popular because it provides a cushioned surface, changes the look of a cockpit or swim platform, and can reduce the hard feel and sound of bare fiberglass underfoot. Pre-cut kits also let an owner update a deck without drilling holes into it.
It is not a structural repair. It should not be used to hide soft core, cracked laminate, failed hatch seals, active leaks or badly damaged nonskid. Foam can also be cut by sharp objects, stained by neglected spills, lifted by poor adhesion and deformed by concentrated reflected sunlight. Those limitations belong in the purchase decision.
Choose the right path: model-specific kit, custom template or sheet material
Model-specific kit
A model-specific CNC-cut kit is the fastest route when the manufacturer, model, year range and deck layout match. AirowMarine lists kits such as the 2002–2007 Sea Ray Sundancer 300 EVA flooring kit and the 1999–2002 Sea Ray 340 EVA flooring kit. These names are fitment references; AirowMarine is an independent seller and is not affiliated with or endorsed by the boat manufacturer.
Even within a stated year range, boats can differ because of factory options, regional production, previous repairs and owner modifications. A listing title is not a substitute for comparing the kit diagram with the actual deck.
Custom template
Use a template or digital measurement process when the exact layout is not listed, when the boat has been modified, or when you want to cover a different set of areas. A good template records pad outlines as well as hatch swing, drain clearance, pedestal bases, removable panels, screw access and the desired direction of the faux-teak pattern.
Sheet material
Sheet material can work for small areas with simple geometry. Compound curves, many hatches and a large multi-piece cockpit increase the risk of uneven gaps and pattern misalignment. BoatUS notes that templating and machine cutting become more valuable as shapes grow more complex.
Browse the custom EVA foam boat flooring collection to see the current model-specific range before deciding which path applies.
Before ordering: build a fitment record
Send or retain the following information:
- Boat manufacturer, exact model and model year.
- Hull identification or build information where it helps distinguish layouts.
- Clear overhead photographs of every area to be covered.
- Close photographs of hatches, drains, table sockets, seat bases and removable panels.
- A marked deck diagram showing which areas are included.
- Several reference measurements between fixed points.
- Color combination and groove direction.
- Any previous flooring, repairs or non-factory modifications.
Reference measurements are especially useful because a photo can hide scale and perspective. Measure between hard, repeatable points rather than estimating from the edge of an old pad that may have shrunk or moved.
When the kit arrives: inspect before dry-fitting
Do not begin by removing adhesive liners. First:
- Check the package for shipping damage.
- Lay out all pieces with the backing intact.
- Compare piece count and labels with the supplied layout.
- Confirm color, groove direction and surface finish in natural light.
- Allow rolled or curved material to relax in accordance with the supplied instructions.
If pieces are missing, duplicated, damaged or visibly different, stop and document the issue before installation. Once a pad has been cut or bonded, a fitment problem is much harder to diagnose.
Dry-fit every piece on the actual boat
Dry-fitting is a full installation rehearsal with all liners left in place. Put every pad in position and verify:
- Consistent gaps between neighboring pieces.
- Alignment of faux-teak lines across sections.
- Clearance around drains, hatch hinges and latches.
- Full hatch movement without foam edges binding.
- Access to screws, inspection ports and service panels.
- No pad crosses a joint that must move independently.
- No edge sits on loose caulk, a sharp ridge or a damaged surface.
Photograph the successful dry fit. Add small pieces of painter’s tape as alignment marks on the surrounding deck. If the kit does not fit, send photos and measurements before trimming it. A small cut can remove the information needed to identify whether the problem is the kit, the layout or the boat.
Prepare the deck as if adhesion depends on it
Because it does. Pressure-sensitive adhesive needs intimate contact with a clean, dry and compatible surface. Wax, sunscreen, silicone, oil, old glue, oxidation and cleaner residue can all interfere.
1. Repair first
Resolve soft deck, cracks, loose hardware, failed bedding and active leaks before covering the area. Confirm that drains work and that water does not remain trapped where a pad will sit.
2. Remove old material and adhesive
Old carpet glue, foam backing and pressure-sensitive adhesive must be removed using a method that is safe for the substrate. Do not assume one solvent is safe on gelcoat, paint, plastic and repaired surfaces. Follow the boat builder, coating supplier and flooring instructions.
3. Wash and rinse
Wash the deck to remove ordinary dirt and water-soluble contamination. Rinse away soap residue and allow the area to dry completely, including seams and hardware recesses.
4. Perform the specified final wipe
SeaDek recommends a final wipe with high-purity isopropyl alcohol on a new clean rag for its products. 3M likewise emphasizes a clean, dry and unified surface for pressure-sensitive adhesives. Use the cleaner specified for the exact flooring and deck finish, test it first, ventilate the area and follow the chemical manufacturer’s safety directions.
5. Control conditions
Avoid installing onto a cold or damp deck. Temperature affects how readily pressure-sensitive adhesive wets the surface. Protect the job from rain, dew, wash water and foot traffic for the curing period specified with the kit.
A controlled peel-and-stick method
Large pads are easier to control with a hinge method:
- Position the pad using the dry-fit marks.
- Tape one half securely so the piece cannot shift.
- Lift the free half and expose only part of the adhesive.
- Lower the pad gradually from the center or fixed edge, keeping it relaxed.
- Apply firm, even pressure over the bonded area, especially at edges.
- Remove the temporary tape and repeat for the second half.
- Roll or press the complete pad as directed by the manufacturer.
Do not stretch foam to force a hole or edge into alignment. Stretching changes the fit and places recovery force on the adhesive. If alignment begins to drift, stop before more adhesive contacts the deck.
Install one piece at a time and keep checking the pattern against adjacent pieces. Leave the specified gaps at moving panels, drains and hardware. Do not seal a pad edge with an unapproved product simply because it looks tidy; some sealants and solvents can damage foam or adhesive.
Areas that deserve extra attention
Hatches and removable panels
Each moving panel should usually receive its own pad. Verify hinge clearance, latch operation and lifting access. Covering a service fastener may turn routine maintenance into a flooring repair.
Drains and channels
Preserve the designed drainage path. An attractive pad should not create a dam, narrow a drain opening or hide a bedding joint that needs inspection.
Pedestal bases and deck hardware
Decide whether the pad fits around the base or whether hardware must be removed and re-bedded. Do not loosen structural or safety-related hardware casually. Reinstallation may require new sealant, fastener torque and access to a backing plate.
Reflected sunlight
Focused reflection from curved glass, polished metal or bright gelcoat can create a hot spot sometimes called light amplification. Foam manufacturers warn that this can deform decking. Observe the boat in its normal storage orientation and consider covers or shading where a concentrated reflection falls repeatedly on one area.
After installation
Respect the adhesive’s stated dwell or cure time before walking on the pads, washing the deck or exposing it to water. Different adhesive systems and conditions require different times; use the instructions that came with the kit rather than a generic number from the internet.
Inspect all edges after the first few outings. Early attention to a lifted corner or trapped bubble may prevent water and dirt from working farther beneath the pad. Do not puncture, heat or re-glue a new pad unless the product supplier confirms the repair method.
Cleaning and long-term care
- Rinse salt, sand and dirt before they are ground into the texture.
- Use a cleaner and brush stiffness approved for the flooring.
- Work along edges and seams rather than scrubbing aggressively across them.
- Clean fuel, oil, fish residue and colored spills promptly.
- Avoid sharp tools, dragging equipment and concentrated pressure-washer jets.
- Check recurring reflected-sun hot spots and protect the surface during storage.
Manufacturer cleaning advice can differ, particularly around bleach, solvents and stain removers. Follow the instructions for the exact material instead of combining several online remedies.
Stop and ask before installing when
- The model year or cockpit layout is uncertain.
- A pad covers a drain, inspection port or required fastener.
- The deck has soft spots, cracks, moisture or active leaks.
- Old adhesive or wax cannot be removed safely.
- Dry-fit gaps or pattern lines are inconsistent.
- The supplied cleaning or temperature instructions are missing.
For AirowMarine fitment questions, send the product link, boat model and year, overhead photographs and several reference dimensions to sales@airowmarine.com. That information is more useful than saying only that the boat is “about 30 feet.”
Technical references
- BoatUS: DIY boat foam decking, templating and installation
- SeaDek: application instructions
- SeaDek: surface preparation, temperature and material FAQ
- 3M: surface preparation for pressure-sensitive adhesive applications
- BoatUS: cleaning and caring for EVA foam decking
SeaDek and 3M are cited for general installation principles published by those manufacturers. Their instructions do not certify the adhesive or material used in an AirowMarine kit; use the instructions supplied with the exact item.

Leave a comment
This site is protected by hCaptcha and the hCaptcha Privacy Policy and Terms of Service apply.